Get a dozen white cedar shim shingles, or equivalent.
Clear the target frame's door rabbet for any obstructions.
Examine each new door for its specific opening.
Occasionally the rabbet depth is incorrect. Common exterior door thickness is 1&3/4". Rabbet depth should be the thickness of the door plus one-eighth inch, as the door should be set in 1/16" from the jamb edge, and, on the hinge side, 1/16" out from the stop to swing clear with room for paint or varnish.
Place it in, or in front of, the opening: crowned convex side to you; top of door up.
Go "slow." Measure twice, cut once. Be deliberate but cautious.
"Board stretchers" are difficult to find, even on eBay.
If the door will already fit within the jamb with no force applied, orient it, using common sense, to have the sightline at the latch side as near to parallel to TAKE OFF AS LITTLE AS POSSIBLE - TOP, BOTTOM, AND SIDES.
To fit the door within the plane of the opening, think in terms of equal stile (vertical member of door's frame) widths cheating to fullness on the latch side (for latch installation specs). Never use locking hardware with so great a setback that the trim extends past the flat surface of the stile. Get different hardware or a door with a wider stile.
Using shims and a flat bar, lift and wedge the door up to lightly touch the frame head.
With the door shimmed in place, on bottom and sides, get on a stool or step ladder, with plenty of good light, and with a pocket scriber or #4 well-sharpened pencil make a series of points by which to mark a line parallel to the head. Even if the head is not straight, the door top cut to parallel it will appear "right to the eye."
Lay the door on your clean and padded sawhorses. Take a four foot straightedge and "connect the dots," within reason. Accurately scribe the line over the stiles with a utility knife or sharp chisel edge to prevent chipping.
Set the depth on your circular saw (with clean, waxed, or formica-clad bottom and sharp blade) slightly greater than the thickness of the door. Cut to the line as precisely as you're comfortable. Though with interior doors you might bevel the head slightly - one or two degrees - (think of a cork in the neck of a bottle) as you may not have been the one to set the jambs ensuring level existing, on an exterior 36" wide door cut the bevel three degrees to allow for spring bronze weatherstripping. Make the bevel greater for proportionately narrower doors (~7° for 28" wide).
If confident of the line go ahead and plane it smooth and true: Porter Cable's "Porta-Plane" is the standard; Lie-Nielsen's "102" also does a great job.
Be sure not to break-off the grain on the outsides of the stiles when planing. Break the finished edges with sandpaper (80/100 grit).
Place the door back in the opening laying 1/16" blue masonry shims, or equivalent, across the top and examine your jambs/stiles gaps. Optimally both are parallel.
Depending on available stock mark the sides in the fashion described for the head. With latch-side butting (bevelling the latch-edge as a function of the door's width: 3 degrees for 36", narrower the door: greater the bevel) and top correct, the remaining gap should be, for an interior door, from a shy 3/16" to under a quarter inch, depending on the thickness of the door stops.
Once satisfied with the top and sides, shim in place and scribe the bottom, for threshold-less interior doors, to provide for complete swing over uneven floors, rugs and carpets, sound and HVAC requirements, and making it "right to the eye:" quarter to a half inch, or other.
Thresholds for exterior doors shall be treated as a separate subject.
Now the fun begins.
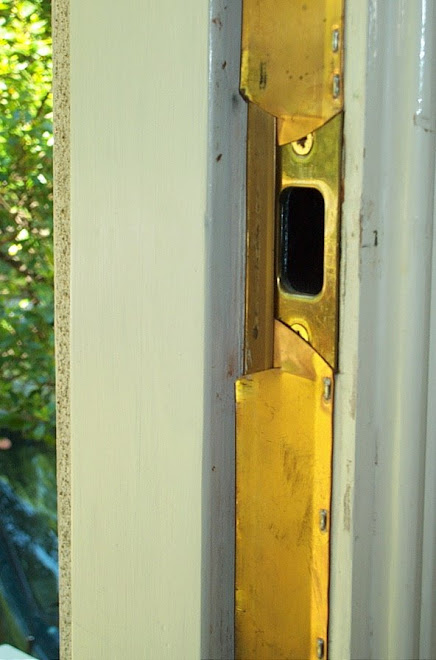
Shim the door, oriented and in accordance with the dimensions and considerations given, placing the hinge stile against the jamb with the existing gains (portion of door jamb, cut out the shape of the hinge, into which the hinge is set flush.
With the scriber and an "Engineer's Eye" transfer the top and bottom heights of each gain to the door stile precisely and accurately. Do not let the door move once the top gap and acceptable orientation of the door is established. The craft of doorhanging requires attention to detail, patience, and a steady hand. Do not allow the door to shift even an iota once the process of transcribing hinge height to door blank begins.
Once all hinge placement marks are correctly established, remove shims and place door in a doorjack or lean it up at the ends of your horses.
Measure the hinge backsets on the jamb. True them if necessary. Depending on condition of skew/parallel of hinge and latch jambs, adjustments from equal backset can be made to compensate that latch close without "spring."
Subtract 1/16" from the frame's determined hinge backset and mark that dimension for your door's gains to be cut - so as to "inset" the door slightly. The stop might be wrong for this. Once the door is hinged correct the hinge stop for a 1/16" gap, top stop 1/16th to nothing.
Cut your gains making sure the hinge will be just proud of the surface to allow for paint or finish. Never should the top surface of the hinge be shy of the surface. As you go along and your confidence builds the bottoms of your gains can be cut to effect shimming for distances needed. Paper shims (business card stock is perfect) should almost never be used other than on the jamb. While highly unusual, there is the rare occasion when required to use cheap "builder's grade" hinges of poor manufacture, that the end of a nail set wedged into the torqued closing hinge "spreads the hinge" to correct effect.
BTW Tage Frid's doorhanging article for Taunton Press is incorrect. Using the correct weight hinge (traffic, door weight) make the hinge placement where the door is correctly placed. In fifty or a hundred years, when the pin wears through the hinge's barrel, replace the hinge.
Fix the appropriate hinge leaves to the door. Take the top's mate and fix it to the top gain on the frame. Likely its depth will need shimming or cutting to be correct. Loosely attach (one or two screws) in the lower hinges' mates, correcting the gain depth as needed.
Lift the door into the top hinge, slide in the pin, align and insert hinge pins below, with door at 90 degrees to opening. Tighten lower hinges carefully.
Gently check your work. Don't wreck what you've done as a "nutcracker."
This is where the art really comes in. Your finished door should have no hinge-bind, the top and latch sides (hinge, too) should be parallel.
The "nickel's width" on the latch and top, "dime" on the hinge, is for exterior doors only...don't worry about close tolerance for interior doors other than to ensure proper latching.
Adjust the hinges to make it "right to the eye." Above all the "machine" must work properly.
Hanging a door true is a source of righteous pride and deserved satisfaction.
Prehung, in general, is to be avoided. The materials in your existing frame are probably several times better than that used in prehung units and your joinery will greatly surpass the work coming out of door mills.
Above all by hanging your own doors you will begin to recapture the pioneer spirit from which America was created. At its founding the population of the United States was 80% independent mechanics. Thomas Jefferson called us "technical artists." He was right about many other things, as well.
A yeoman artisanry had the virtue and vision to craft this nation.
Hang a door: pursue, and achieve, human perfection.
Good luck. Chances are a homeowner following these directions will do a much better job than someone passing himself off as a "carpenter."